|
|
|
 |
How to Glue Fittings Onto PVC Pipe
 |
Apply solvent cement to both ends of the pvc being joined.This will temporarily melt a thin layer of PVC, which will resolidify in seconds. Once the pieces are put together it will form a seamless airtight waterproof seal. You must work quickly. The process of gluing pvc is very simple, however it is unforgiving. The weld sets very fast and the only way to change it is to cut it off. |
Follow the instructions below to ensure a proper connection:
- Measure and cut. To make sure the pipe will be correctly seated in its fitting you will need to measure the distance between the shoulders on each end of the pipe fitting. You will then transfer the measurement to the pipe. Make a straight cut with a hacksaw. Scrape the inside of the cut smooth with a utility knife.
- Prime. Spread pvc cement primer on the outside of the pvc pipe. Then spread the pvc cement primer to the inside of the fitting where the pvc will overlap.
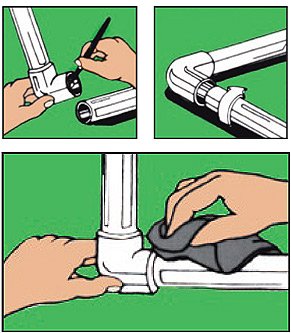
- Dry fit. Next you will assemble all the pieces to ensure the pipe has been cut to the correct length. Make a reference mark from the pipe onto a fitting such as an elbow. The position on these fittings is critical..
- Glue. Now apply the cement to the primed areas on the inside of the fitting and to the outside of the pipe. The glue sets very fast, so make sure you are ready to join the pvc before applying the glue.
- Push and twist. Slide the pvc pipe until it hits the fitting's shoulder. Then give it a ¼-inch turn to spread the glue and speed its cure. If you're attaching a fitting, push it in with the reference marks slightly out of register, then turn the fitting to align the marks.
- Hold. Hold the connection together for 30 seconds.
- Wipe. Clean off any excess cement by wiping it with a dry rag.
|
|
|
Copyright © 2010 IrrigationRepair.com - All Rights Reserved |
|