|
|
|
 |
General instruction on how to install rain sensors
 A homeowner can easily connect the most common type of rain sensor, a standard wired or wireless rain shut off device, to a typical 24-volt irrigation controller using simple hand tools and a ladder. Sensors with an electrical rating of 125-250 VAC for use with 110 or 220-volt controllers must be installed by a licensed electrician. A homeowner can easily connect the most common type of rain sensor, a standard wired or wireless rain shut off device, to a typical 24-volt irrigation controller using simple hand tools and a ladder. Sensors with an electrical rating of 125-250 VAC for use with 110 or 220-volt controllers must be installed by a licensed electrician.
Each wired or wireless rain shut off device comes packed with instructions for a variety of installations--new, retrofit, same-brand, different-brand, sensor location, conduit, bare wire, with or without a bypass switch, etc. Here are some tips common to all installations:
The most important aspect of installing a rain sensor is where to place it. It should be installed in an area that is unobstructed by trees, roof over hangs, or anything else that might block rain from getting to the sensor. If it is a wired sensor, placement is generally near the sprinkler controller. The wires should be connected inside the controller's valve wiring panel. This allows for easier electrical trouble-shooting of the system as the sensor can be easily disconnected.
Choose the best location for the sensor. If the sensor is wired, try to find a location close to the controller. Consider how the wire will be run from the controller. If the sensor is wireless, look for a location with few obstructions between the sensor and the receiver. The sensor should be in a location that closely matches ground conditions of the area it monitors. If the area is mostly shady, install in a shady location, but not directly under buildings or trees. If the area is sheltered from wind, then the sensor should be sheltered from wind as well. This is so that the hygrophonic disks (or cup) will dry at approximately the same rate as the soil. Ideally the sensor location should be chosen before the sensor is selected since various models come with unique mounting hardware. |
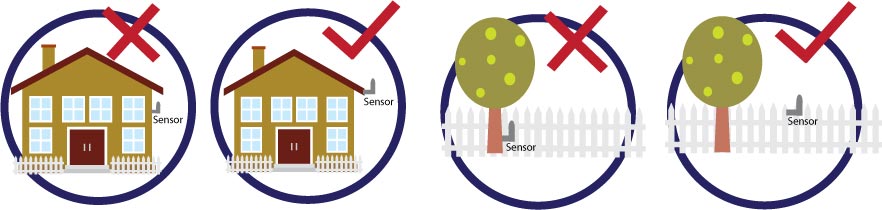 Avoid roof, trees or anything else that might block rain from getting to the sensor
|
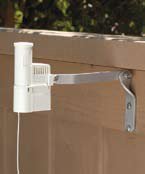
Install the sensor plumb and in the upright position. The sensor is designed to capture rainfall from all directions. Don't try to lean the sensor into the normal wind direction and don't attach directly parallel to facia that is not plumb.
Use waterproof connectors to join wires outdoors. Refer to the controller manual to determine whether to wire for a "normally open" or "normally closed" application, and use the appropriate wiring diagram from the sensor instructions for the sensor/controller combination.
After installation, the procedures for set-up and testing also vary by sensor model. Most sensors have two adjustments--one for amount of rain that can fall before the shut off is triggered and one to control how fast the disks or basin dry so that the system can resume operation. Usually further adjustments are made throughout the first season to achieve ideal settings.
Annual maintenance for most rain shut-off devices is simply a matter of normal inspection and cleaning. Occasionally the hygrophonic disks will wear out and need replacement. Wireless models will need new inexpensive batteries every five or ten years when the battery indicator starts blinking. Occasionally a sensor may be damaged by falling tree limbs or other physical forces and require replacement. A few minutes every year is all it takes to keep the sensors in top working order.
SprinklerWarehouse.com offers a large selection of rain shut-off devices for residential and commercial irrigation systems. Hunter, Rainbird, and Toro brand wired and wireless sensors, connectors, all the necessary handtools for installation, and manufacturers' product information manuals are just a click away.
|
Click Here to Shop
 Related Topics: Related Topics:
|
|
|
Copyright © 2010 IrrigationRepair.com - All Rights Reserved |
|