|
|
|
 |
Tap Into A Water Source - What Method to Use for a drip irrigation system
CHOOSING A METHOD TO START
Determining how to start a system and what products to select are important decisions that should be made carefully. The correct choice will depend on the size of the area, the availability of water outlets, the garden design and the type of plant material to be irrigated. From the following three methods, you can choose the start method that is appropriate for your drip application.
- Method 1 - Faucet Connection
One of the easiest ways to install a drip application above ground is starting from an outdoor faucet using 1/2" poly tubing as the main lateral line. It can be set for automation by using a hose-end-timer. Attach one of the kits below to the faucet and the 1/2" poly tubing to the swivel adapter.
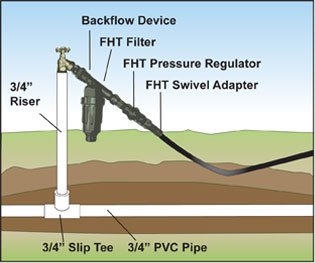
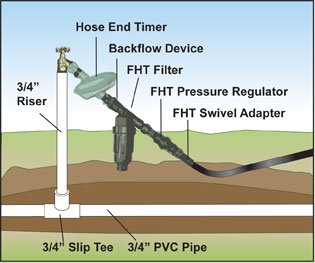
- Method 2 - Connect to an Irrigation Valve
Another way to connect your drip application is to connect it to an above ground anti-siphon valve or a below ground valve. An anti-siphon valve is a combination valve and atmospheric backflow preventor. An in-line valve requires the use of a backflow prevention device. Remember to check local codes for either application.
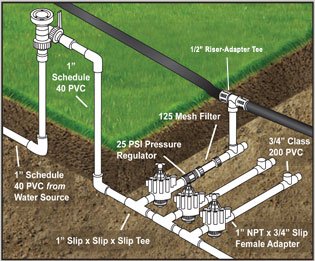
Below ground In-line installation using a pressure regulator, mesh filter, 1/2" riser and adapter tee. |
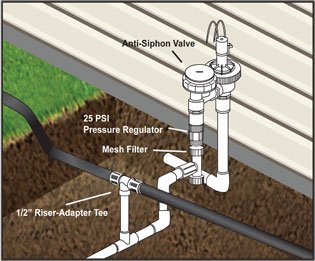
Above ground anti-siphon installation using a pressure regulator, mesh filter, 1/2" riser and adapter tee. |
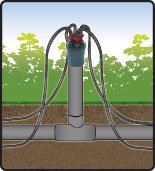
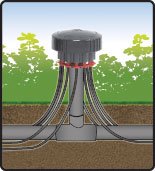
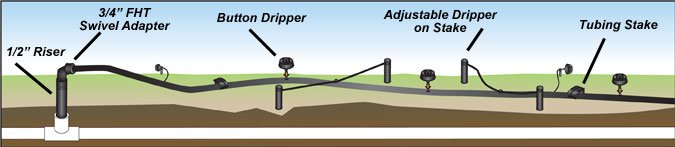
- Method 3 -Retrofit a Sprinkler System Riser
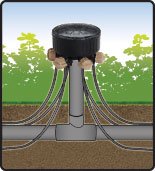
You can retrofit a sprinkler head or 1/2" riser by removing a sprinkler head and attaching a single, 4-outlet, 6-outlet or a 12-outlet drip head. From the drip head, extend micro tubing to the plants and secure with stake if needed.
You can also use a conversion elbow, pressure reuglator and swivel adapter to convert a 1/2" sprinkler head riser directly to poly tubing. |
|
|
|
Copyright © 2010 IrrigationRepair.com - All Rights Reserved |
|