|
|
|
 |
Step by step Drip irrigation System installation
Welcome to Sprinkler Warehouse's Drip Irrigation installation school. This guide is layed out in easy to follow steps with colorful illustrations and cutting edge animations.
Compared to conventional sprinkler systems, drip irrigation systems are simple to design, inexpensive, and easy to install. Traditional high volume, high pressure sprinkler systems require careful planning, extensive trenching, and special tools and glues. These efficient systems deliver water measured in Gallons Per Hour (GPH), and apply water only where it is needed. This can improve plant health, conserve water, and reduce the growth of weeds all at the same time. If you need to buy any irrigation parts and accessories, please visit SprinklerWarehouse.com
 |
 |
|
|

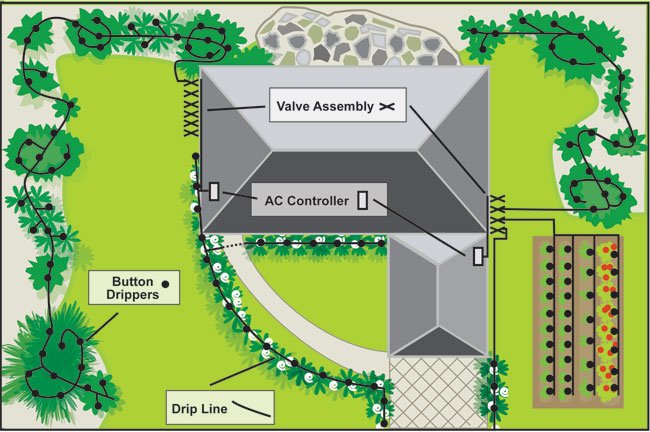
When designing an irrigation system consider the various areas and plants to be watered. We suggest using a drip irrigation application on trees, shrubs, vines, vegetables, flowerbeds, plant containers, pots, any individual plant and narrow planting areas.
CREATE A PLANT LIST
Note the list and locations of small and large trees, shrubs, groundcover, flowerbeds and vegetable gardens. Then divide the plants into groups with similar watering needs and plants that are in full sun or in shaded areas.

Soil is like a storage room for plant nutrients. It is the medium through which water and nutrients move. It anchors plants and is a reservoir of water for plant growth. There are various types of soil with different characteristics which determine what types of drippers or micro sprinklers should be used. To determine which type of soil you have in a given area, take a handful of dry soi, grip tightly and release. To determine which type of soil you have in a given area, take a handful of dry soi, grip tightly and release.
-
SANDY SOIL - Sandy soil will crumble and fall apart when relased. Water will tend to go straight down in this type of soil.. Use closely spaced 2GPH drippers 10-12" apart or micro sprinklers in a wider spacing configuration.
-
LOAMY SOIL - Loam soil will hold together but then easily break apart. Water will move slowly and will spread evenly. Use 1GPH drippers with 16-18" spacing.
-
CLAY SOIL - Soil containing clay will hold together without breaking and water will be absorbed very slowly. Use .5GPH or 1GPH drippers with a 18-24" spacing.
|
| |
|
|
|
|
Copyright © 2010 IrrigationRepair.com - All Rights Reserved |
|